
How I Registered at BIR as a Freelancer & Self-Employed Professional in the Philippines
Let me guess. You’ve stumbled on this article because just like many of us, you also want to make your freelancing career official by registering at the Bureau of Internal Revenue (BIR). Kudos for even thinking about it. Many freelancers or digital nomads skip the freelancer BIR registration because of the long, tedious process, and paperwork. I know, I’ve been there.
But, is it really worth all the hassle?
I would say yes! First of all, it is our obligation as citizens of the Philippines to pay our taxes.
Secondly, it makes our work or profession legit with official receipts or invoices we can issue to our clients.
Lastly, especially for digital nomads, we’ll have our Income Tax Return (ITR) so we can travel the world without worrying about incomplete requirements for visa applications. In fact, I got my South Korean visa in Cebu approved as a self-employed professional. You may read my Korean visa guide for self-employed Filipinos.
Now, let me share with you what I’ve gone through so you’ll have a reference if you decide to do it yourself. I’ve broken down the overwhelming process into simple, easy-to-follow steps.
What is a self-employed professional in the Philippines?
Before anything else, what is considered a self-employed professional? BIR refers to freelancers as self-employed professionals who earn income from their services with or without a professional license.
Self-employed professionals include, but not limited to, individuals who are working in the digital media industry such as writers, editors, bloggers, vloggers, content creators, as well as in the creative and tech industries like designers, photographers, web developers, software engineers, and the like.
In addition, professionals such as doctors, accountants, consultants, real estate brokers and agents, etc. who are working independently without direct employers are also considered self-employed.
Simply put, if you are working as an independent contractor earning income from the services you provide, you are considered a self-employed professional, unless the company you are working for is registered in the Philippines and pays all your taxes and government-mandated benefits.
Also, if you have a business where you sell products or goods, that’s another type where you would have to register as a sole proprietor. If you earn income both from your full-time employment and side hustles, you need to register as a mixed income earner.
Do note that this particular guide will only tackle the BIR registration for freelancers and self-employed professionals.
Steps to Register as a Freelancer or Self-Employed Professional at BIR
Step 1: Gather these initial requirements
1.1 Secure these documents:
- Two (2) valid IDs + photocopies
- PRC License (if applicable)
- Proof of residency
- Certificate / Contract / Portfolio to explain and show proof of your work
1.2 Proceed to your Barangay Hall to get your Barangay Clearance or Certificate
Different barangays have different fees and requirements to get a barangay clearance. I got mine in Brgy. Subangdaku, Mandaue for ₱80, and they asked for my proof of residency.
1.3 Proceed to your Municipal / City Hall to get:
- Occupational Tax Receipt (OTR) for professionals without a PRC License
- Professional Tax Receipt (PTR) for professionals with a PRC License

Step 2: Get your Taxpayer Identification Number (TIN)
You also need to get your TIN for your freelancer BIR registration. Most freelancers I know already have a TIN because they were previously employed and the company got the TIN on their behalf. In any case, you should know the BIR Revenue District Office (RDO) your TIN is connected to.
Tip: To know the RDO your TIN is connected to, you may inquire via the Chatbot Revie on BIR’s official website. The TIN Verifier App on Google Play is no longer available according to BIR’s advisory.
If you still don’t have a TIN:
- Download and fill out BIR Form 1901, which is the BIR Form for Self Employed.
- Visit the nearest BIR Regional/District Offices (RDO) to register manually.
- Submit the form and get your TIN from your RDO.
If you already have an existing TIN:
- To change your status from employed to self-employed, download and fill out BIR Form 1905.
- If you need to change your RDO, indicate “Transfer to another RDO” on the form, and submit to your old RDO to have it changed. RDO transfer processing time takes about seven (7) working days.
Tip: You don’t need to accomplish BIR Form 1905 if you will apply as self-employed in the same RDO. BIR Form 1901 will already suffice.
Step 3: Compile all the BIR requirements
- Barangay Clearance
- Occupational Tax Receipt / Professional Tax Receipt
- Stamped BIR Form 1905 (if you transferred RDOs from Step 2)
- Stamped BIR Form 1905 (for the registration of Books of Accounts)
- Accomplished BIR Form 1901 – three (3) copies
- BIR Form 0605 (for paying) – three (3) copies
- Birth Certificate – original and photocopy
- Marriage Certificate (if applicable) – original and photocopy
- Title of Property (if you own one) – original and photocopy
- Notarized Lease Contract and Authorization Letter from Renter (if property is leased; know the size of the property as well) – original and photocopy
- Proof of Billing with the address that you will use – original and photocopy
- Two (2) valid IDs – original and photocopy
*See the official BIR checklist of requirements for self-employed and list of BIR forms.
Tips:
- Not all requirements listed here may be required by your RDO. In my case, the person handling my application in Mandaue City RDO 80 didn’t look for the property title or lease contract anymore. But it’s still best to prepare all these documents so you don’t have to go back and forth in case your RDO requires them.
- You don’t have to get a Mayor’s Permit if you are applying as a self-employed professional.
Step 4: Apply for your Certificate of Registration (COR)
Bring all your documents to the current RDO and apply for your BIR Certificate of Registration (COR) as a Self-Employed Professional. Follow your RDO’s filing process.
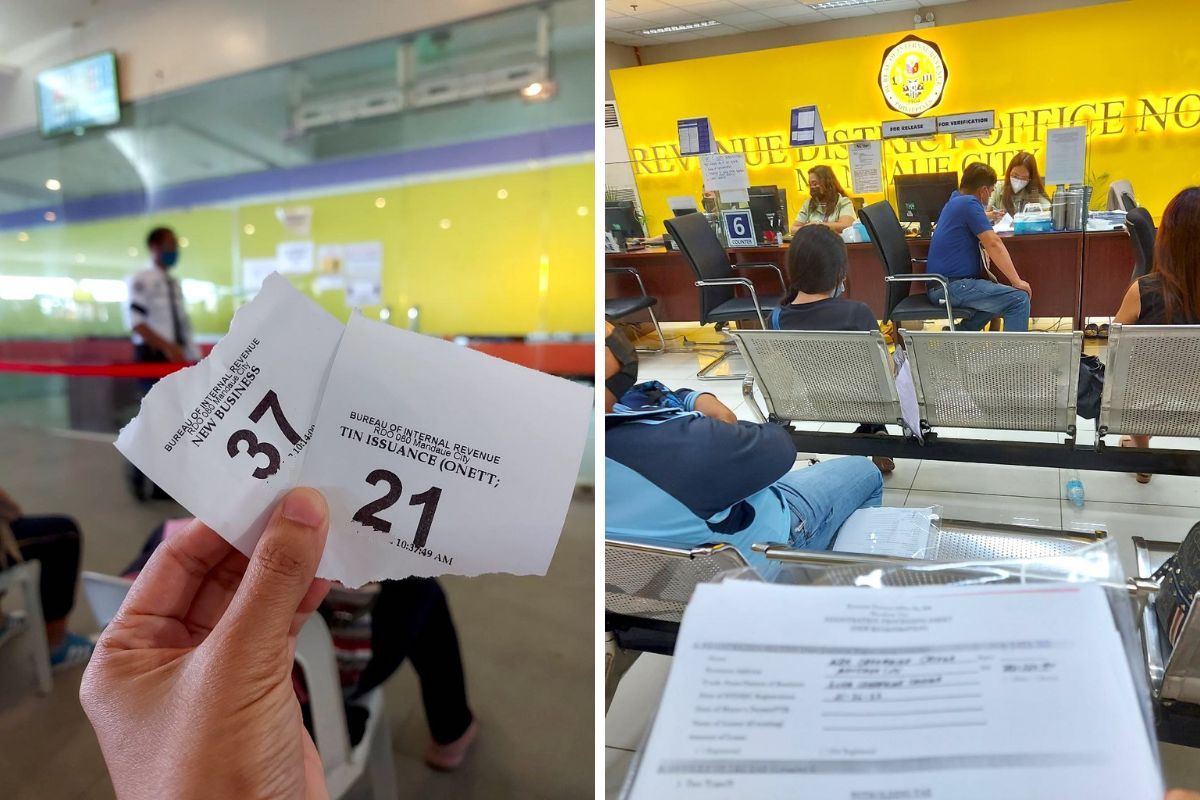
As for me, I got a priority number and lined up for “New Business”. After the first step of submitting the documents, I was redirected to another window for assessing. I also asked the BIR officer for their recommended printing company. I got an Authority to Print and gave it to the printing store outside the office. More on this on Step 7 below.
Tips:
- Go early so you can secure your priority number for registration. In RDO 80 in Mandaue City, Cebu, the security guards give out priority numbers as early as 7am. Wear comfy clothes and bring food and water as you might end up queuing the whole day. It happened to me, sadly.
- Familiarize yourself with the entire process, so you already have a mental note on what to do. As for me, I’ve read several guides from Taxumo, BIR, and other blogs just to give me an idea. No amount of reading could prepare you for the actual legwork though. So brace yourself!
- When in doubt, always ask the guards or attendants. They aren’t the friendliest, but it’s better to ask than waste your time following the wrong process.
Step 5: Buy Journal Ledgers for your Books of Accounts
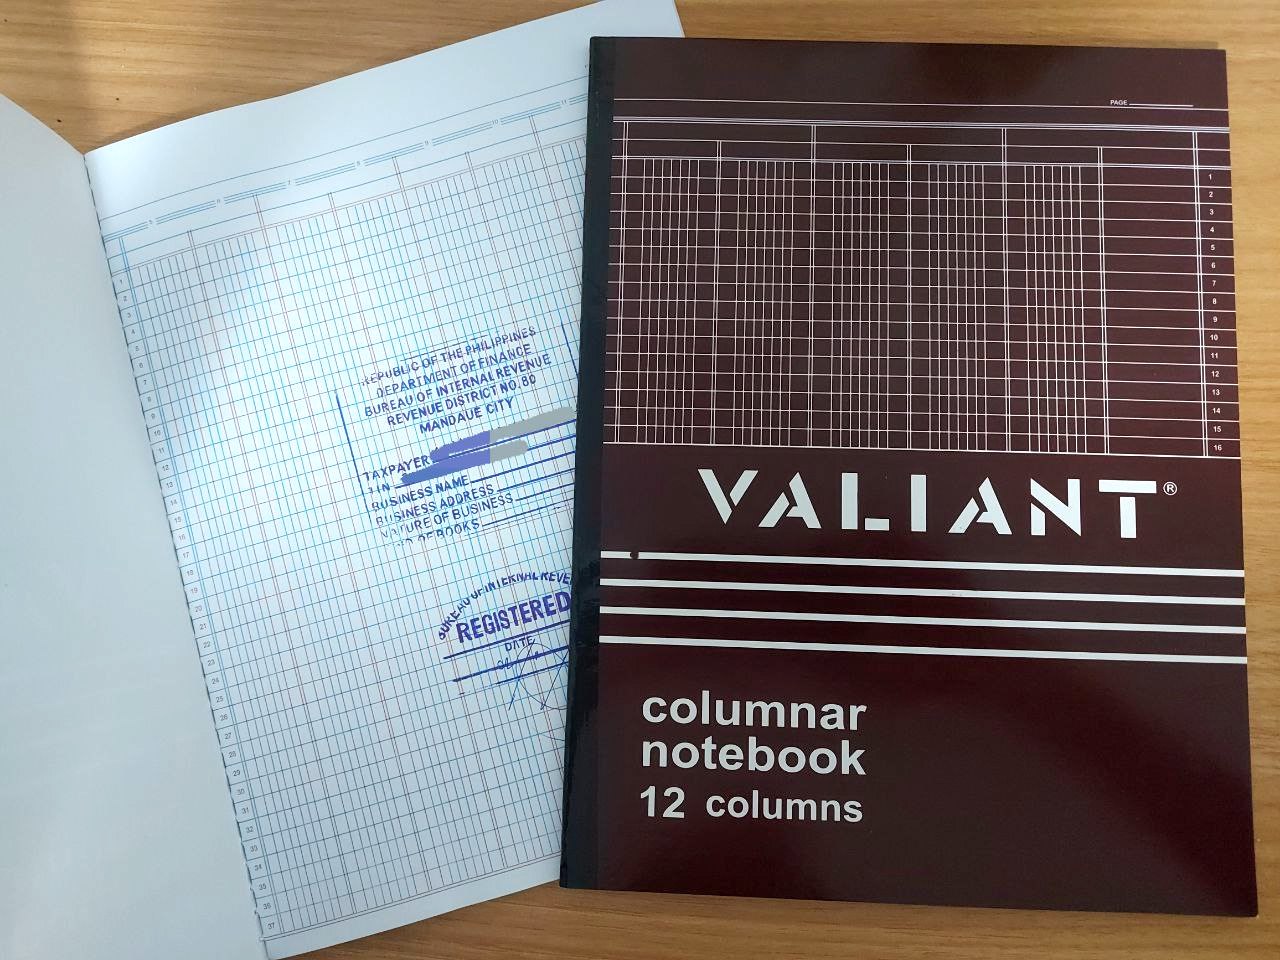
Buy two (2) Journal Ledgers (8-12 columns) for your Books of Accounts. I bought Valiant Columnar Ledgers for ₱39 each from National Bookstore. You should bring these two ledgers when you claim your COR so you can have them stamped and signed by BIR.
Step 6: Claim your BIR Certificate of Registration (COR)
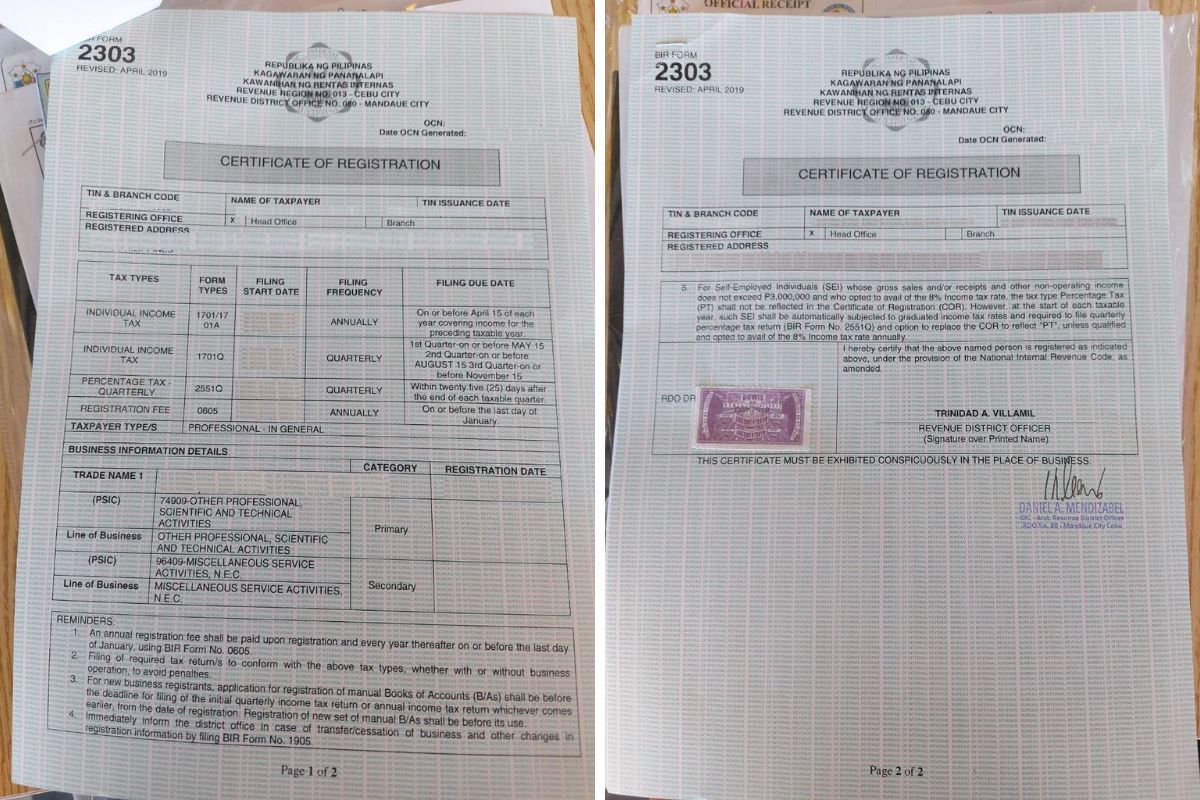
After 14 working days since my application, the BIR texted me that my Certificate of Registration (COR) was ready for pick-up. I went there to get my COR and paid the registration fee of ₱500. The cashier was not available inside the RDO so I had to pay at the PNB branch outside. Note that you can opt to pay your BIR dues at any of the accredited banks by your RDO.
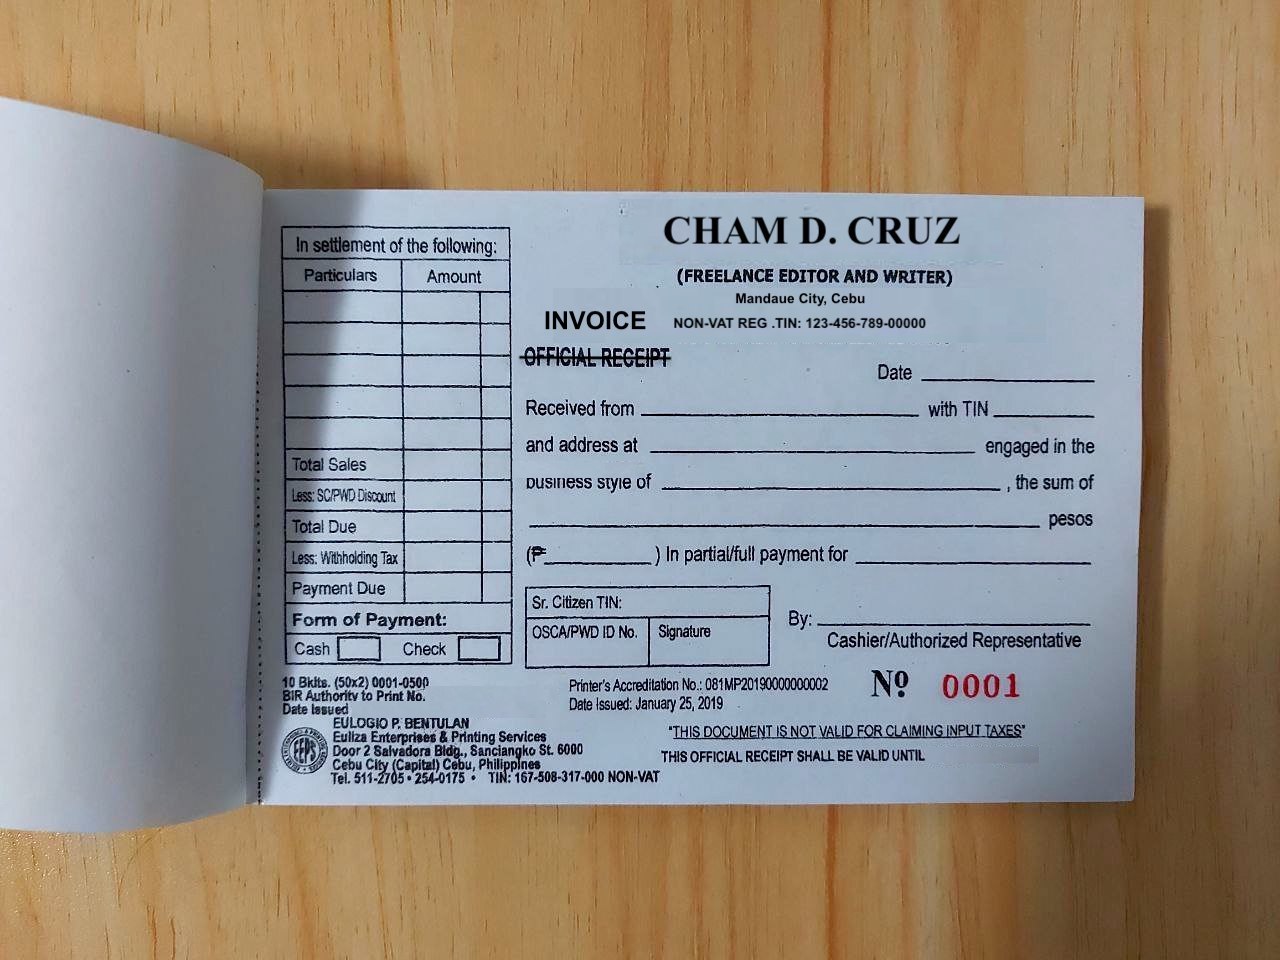
Step 7: Print your BIR Invoice (previously Official Receipt)
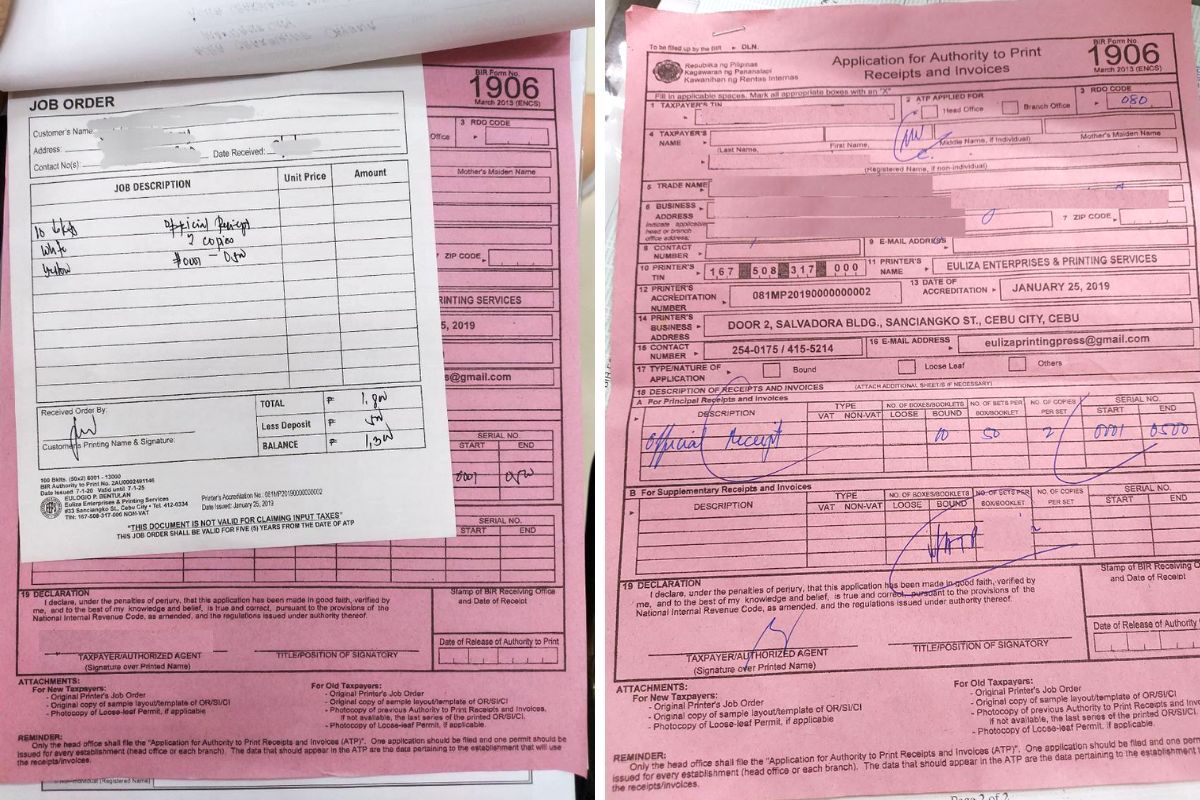
Once your Certificate of Registration (COR) is released, you can already print your Official Invoice (previously Official Receipt). Your RDO may give you a list of accredited printers. Or you can specifically ask for their recommended printer like I did.
1) Give the following to the authorized printer:
- Filled out BIR Form 1906 – Application for Authority to Print Receipts and Invoices
- Format of Official Invoice (Optional)
2) Wait for the authorized printer to print the booklets of your official invoices. Printing usually takes two (2) weeks depending on the printing company.
[UPDATES]:
- As per RMC No. 14-2024, BIR will longer collect a registration fee of ₱500 for new and annual renewal of businesses effective 22 Jan 2024.
- In July 2022, BIR announced that the 5-year validity of official receipts/invoices has been removed. Meaning, your BIR receipts/invoices will no longer expire.
- As per RMC No. 77-2024, unused official receipts will have to be converted to invoices. Read the official FB post of BIR Commissioner Romeo Lumagui Jr. for more details. You may also read Taxumo’s guide on transitioning BIR receipts to invoices.
- If you missed the 31 July 2024 deadline for the submission of Inventory List of Unused Official Receipts Converted to an Invoice (Download RMC No. 77-2024 Annex C Template), you will have to pay the statutory penalties (minimum ₱1,000) and submit other requirements including the Payment Form 0605 (3 copies) and proof of payment to your RDO.
Step 8: Claim your booklets
When you claim your booklets, go back to your RDO to have them stamped.
Tip: You don’t have to print as many as 10 booklets if you won’t issue that many invoices to your clients. I would say 3-5 booklets will already do so you can save on costs. My 10 booklets cost ₱1,800 (₱500 reservation fee, then ₱1,300 when claiming). I regret printing 10 booklets as I’m sure I won’t use up all of them.
Step 9: Attend the seminar
BIR conducts a tax filing seminar before you claim your COR. But at the time of my application, I didn’t have to attend the seminar. I have no plans to manually file the taxes myself anyway. Instead, I opted to avail of Taxumo’s services where they file the taxes on my behalf.
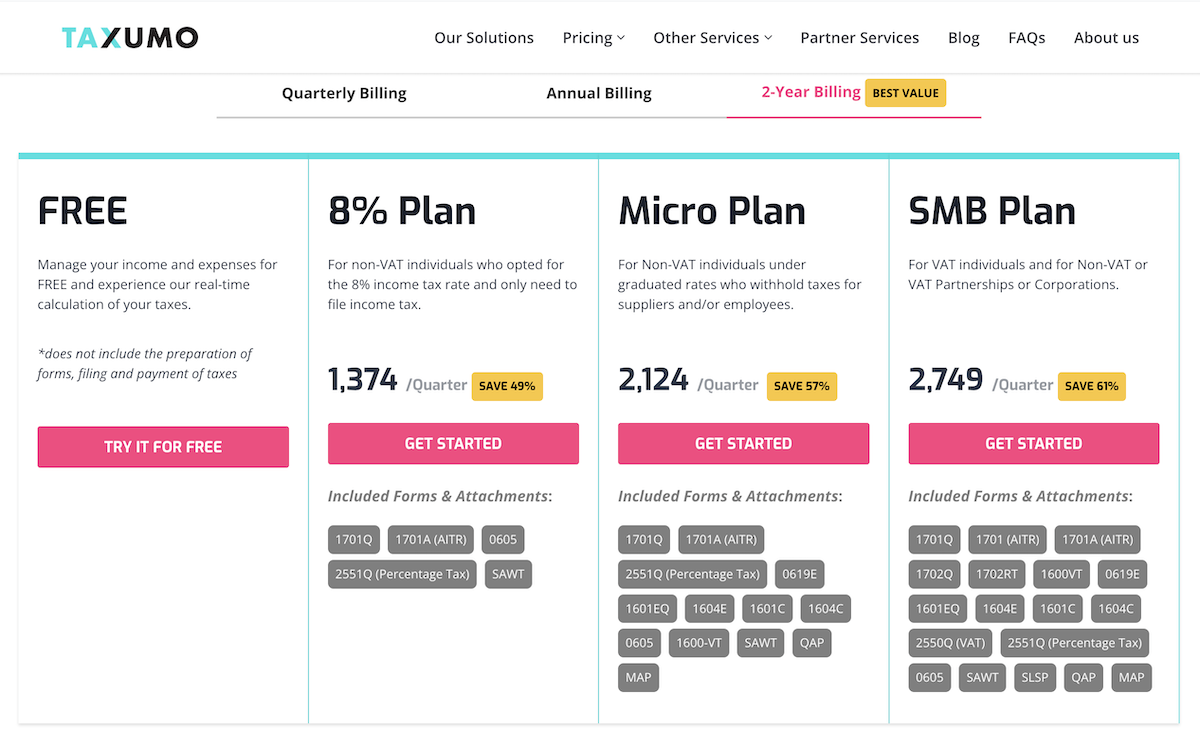
Taxumo has different subscription plans depending on your needs and budget. I subscribed to their 2 Year 8% Plan, (one-time payment for 2 years), which is a good deal, considering I don’t have to fill out all the forms and go to BIR to pay the tax dues myself. It’s really convenient, and I’m one happy customer here. Feel free to use my Taxumo coupon code: CharmTax to get a 5% discount on your Taxumo subscription.
My freelancer BIR registration cost breakdown
- Barangay Clearance = ₱80
- Occupational Tax Receipt = ₱110
- Columnar Ledgers x 2 = ₱78
- Certificate of Registration (COR) = ₱500
- Documentary Stamp = ₱30
- Printing of Official Receipts x 10 = ₱1,800
- Others (printing and photocopy of docs) = ₱480
Total = ₱3,078
*Note that the total cost does not include my Taxumo subscription plan and the actual taxes I filed after my freelancer BIR registration.
There you have it. The freelancer BIR registration process is truly NOT a walk in the park. I would say it took me a lot of time, sweat (literally!), and funds to legitimize my freelance work. But with the right research, patience, and perseverance, I’m sure you can accomplish it.
All the best in your freelancer BIR registration. Kaya mo yan! (You can do it!)
Before you go, read our guides on how to pay SSS contribution online, how to pay PhilHealth online, how to pay Pag-IBIG online, and how to pay Pag-IBIG MP2 online. They’re worth reading, especially if you’re finally taking your freelancing career seriously.
Disclaimer: I’m not an accountant or a tax expert. This freelancer BIR registration guide is simply based on my experience when I registered as a self-employed professional in 2022. This article is constantly updated for freshness and accuracy of information. Please do your own research as the process is different in every BIR office. Some steps may also change when you apply. Visit BIR’s official website for more information.